-40%
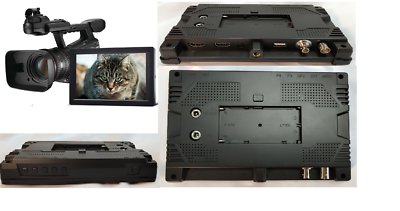
7'' IPS 1920*1200 LCD Monitor/ 3G SDI Optical Input With Fiber ST Port
$ 184.8
- Description
- Size Guide
Description
Product OverviewThank you for purchasing our photography, broadcasting kits color lcd monitor, which adopts advanced integrated digital signal processing circuits and professional IPS LED panel, which makes it high brightness, low power consumption, stable performance, low radiation etc. It equipped with HDMI, SDI Optical signals input and SDI BNC loop-out, which make it wide application, casing compact, simple operation, portable convenient and strong compatibility. Advanced
features
include
Histogram,
False
Colors,
Zebra Exposure,
Focus
Assist, Battery Status, Embedded
Audio,
Nine
Grid,
Center Marker, Safe Frames, Color Temp., Picture Setting, Color Setting etc.,
ideal
portable
lightweight
as
viewfinder
and
video
monitor equipment
To ensure the best use of this product, please read this manual carefully beforehand.
CAUTION
1. Please use the adapter attached in the accessory, if necessary, please use qualified adapter.
2. Please don't expose this product to direct sunlight, heat, or humid conditions.
3. Please keep away from strong light while using this product to ensure the image effect and long-term use.
4. Please avoid heavy impact or drop onto the ground.
5. Please don't use chemical solutions to clean this product. Please wipe with a clean soft cloth to maintain the brightness of the surface.
6. Without adjustable component in the unit, please do not take apart or repair the unit by yourself, to avoid damage the product.
CONTENTS
1. Product Description -------------------------------------------------------------------------4
2. Operation Instruction ----------------------------------------------------------------------6
3. Menu Description----------------------------------------------------------------------------6
4. Technical Parameters -----------------------------------------------------------------------11
5. Trouble Shooting-----------------------------------------------------------------------------12
1. Product Description
1.1 Front Panel Features
●
Matched with sunshade(include:sunshade frame
and PVC foldable sunshade)
1.2 Rear Panel Features
POWER
: Power on/off
,
press it for 2-3 second to power on/off
2.
LED
: pilot light
3.
F4
: Self-define the function as user need.
4.
F3
: See F4.
5.
↑
/F2
: Multi button. In OSD Menu is for up adjustment or select item of sub-menu. It can be custom button when not in OSD. See F4.
6.
↓
/F1
: Multi button. In OSD Menu is for down adjustment or select item of sub-menu. It can be custom button when not in OSD. See F4.
7.
MENU
: Menu or Enter button
8.
DC-IN:
Power input
9.
DC-OUT:
Power output
10.
F-970/LP-E6:
Battery slot
11.
HDMI-OUT:
HDMI loop out
12.
HDMI-IN:
HDMI Input
13.
EAR:
Audio output
14.
USB:
upgrade firmware
15.
SDI-IN:
SDI Optical Input (ST/UPC)
16.
SDI-OUT:
SDI BNC loop-out
17.
1/4
"
:
Bracket fixed socket
2. Operation Instruction
After correctly connect to the power supply,Press POWER button for 2-3 second to turn on , the indicator will turn (Red)
2.1 Press “MENU” button to enter OSD main menu, and press“
↓
/F1”or“
↑
/F2”button to go through the contents of main menu.
2.2 Then press “MENU” button to enter secondary menu (cursor move to secondary menu position), If users need to go through or select the items in the secondary menu, then press this button “
↓
/F1” or “
↑
/F2” button to move the cursor.
2.3 After select the items in the secondary menu, then press “MENU” button to confirm the item selection, at this time users could press “
↓
/F1” or “
↑
/F2” button to adjust the item parameters.
2.4 Press “MENU” button confirm the item adjustment.
2.5 Press “F3/F4” button or return to exit the menu.
Main Menu
Sub-menu (Function)
Adjustment
Marker
Safety Marker
16:9
Function
Center Marker
off
Picture
Marker Mat
off
Shortcut
Marker Color
yellow
Color
return
System
return
3. Menu Instruction
● Marker
★
Safety Marker:
Safe Frames setting on the image. Center Marker, Marker Type and Safe Frames can be display at the same time.
★
Center Mark:
Screen Center Marker (cross marker) display settings.
★
Marker Mat:
Cover up partial picture
★
Marker Mat Alpha:
Picture masking degree adjustment
★
Marker Color:select marker line color
● Function
★
Mono Chrome:
Close the other two colors of the color image or saturation to make it single color image.
★
False Color:
It is the analysis of the whole image brightness and display False Color. It is convenient to guide using light when shooting and post production.
★
Zebra:
When it is overexposed, the screen appear the twill zebra to reflect exposure of the monitor video image. It is to remind the photographer of adjusting aperture to get suitable exposure value.
★
Peak:
By sharpening the edge of images to help photography for focusing operation.
★
Peak Color:
When shooting under the colorful profusion images or the natural light view, the user might not be sensitive react to the edge of the single line, at this time the user can change the color of the auxiliary focus hook edge line to improve the sensitivity of the image contour, which is convenient for tracking to focus in the process of filming select auxiliary focus hook edge color (Red, White, Blue ,Yellow)
★
Y Histogram:
It stands for the image pixels numbers in each level of brightness and shows the brightness distribution of pixels in the image
★
Audio Bar:
The Audio Level Meters provide numerical indicators and headroom levels. Less than -20dB is green color; less than -10dB is yellow color.
● Picture
★
Scan Mode:
Monitor scan mode for the image signal resolution. Turn on “Over Scan” function, it will display 90% image of the original signal image.
★
Video Ration:
Adjust
dispaly
ratio
★
Anamorphic Mode:
It uses together with some side screen film lens to restore the real proportion of scene.
★
Zoom:
Image Zoom-in function, change relative zoom factor to zoom the image corresponding, which will help image the photographer observe the image more clearly.
★
Freeze:
The current picture still (capture function).
★
Flip H:
Image horizontal direction flip function.
★
Flip V:
Image vertical direction flip function.
★
Dot to Dot:
The display mode makes the resolution of the image consistent with display of the physical resolution.
The resolution of the input video beyond the screen resolution will only display the image middle position. If the input video resolution is lower than the screen resolution, screen picture surface will add black color.
●Shortcut
★
F1/F2/F3/F4:
To set the 4 shortcuts definition function F1, F2, F3, F4 on the front of the monitor panel.
●Color
★
Backlight:
Adjust panel backlight brighness
★
Brightess:
To adjust the image's brightness.
★
Contrast:
To adjust the brightest and darkest ratio of the image. Please pay attention to the image levels when adjust the proportion of the brightness and darkness, the image will lose the colorful gorgeous when the adjust proportion is too big or too small.
★
Saturation:
To adjust the current image color saturation.
★
Sharpness:
hook edge line of image
★
Hue:
Adjust
the
hue
to
make
a
perfect
image
display
under
the NTSC format to reach the user like.
★
Colortemp:
Select monitor color white color temp. When select ‘user’, according to the need of image's R/G/B ratio adjustment, to meet user requirements for image in different color temperature.
●System
★
Language:
To select menu language.
★
Transpancy:
Display the menu translucently on the screen.
★
OSD Time:
Set up OSD display time
★
Volume:
Control the volume of Speaker or earphone.
★
Mute:
Close the volume of speaker or earphone.
★
Input:
select input source
★
Reset:
Back to original setting.
★
Upgrade(USB):
Use USB update port, insert the U update disk and select confirm the software data update.
4 .Technical Features
OPTICAL
SMPTE Standard
Support Video Pathological Test Code Compliant
SDI Optical Input Supports
270 Mbps, 1.483 Gbps, 1.485 Gbps, 2.967 Gbps, and 2.97 Gbps
Fiber supports
Single Mode and Multi-Mode fiber
Optical Input bitrate
5-3000M bps
3G SDI Optical Receiver Sensitivity
<-20dBm (Optical Source ER 9dB, BER 10E-12)
Acceptable Optical Input Wavelenght
1260-1620nm
SDI Optical Input Support Format
480i/576i
720p(60/59.94/50/30/29/25/24/23.98Hz)
1080i(60/50)
1080p(60/50/30/25/24/23.98Hz)
Loop-out BNC
SDI BNC Loop-out Impedence
75 OHM
Jitter
<0.2UI @2.97 Gbps
Eye Overshoot
Amplitude<10%
@2.97 Gbps
Rise/Fall time
130-800ps @SD,HD,3G Signal
SDI Loop-out Cable Out Reach
3G:100m, HD-SDI:150m SD-SDI:300m (Belden 1694A)
HDMI
HDMI Support Format
480i /480p /576i /576p/
720p(60/59.94/50/30/29/25/24/23.98
)
1080i(60/59.94/50)1080p(60/59.94/50/30/29.97/25/24/24sF/23.98/23.98sF)
Audio
Headphone Output
stereo 3.5mm
Others
Panel Size
7.0 inch
Panel Type
IPS LCD
Resolution
1920
×
1200 pixels
Backlight
LED
Dot Pitch
0.07875(W) x 0.07875 (H)mm
Aspect Ratio
0.673611111
Brightness
450cd/
㎡
Contrast
50.00069444
Viewing Angle
80
°
/80
°
(L/R) 80
°
/80
°
(U/D)
Input Signal
HDMI Input or SDI Optical Input
Input Voltage
DC:5-16V
Power Consumption
≦
8W
Unit Size (mm)
184(L)x120(H)x25(D) mm
Unit Weight
320g
Installation Method
1/4 inch bracket screw holes, can be easily connected to
the hot shoe mount, tripod fixed installation
Battery Model
F-970 or other Models compatible with F-970
Working Temperature
-
20
℃~
55
℃
Storage Temperature
-
30
℃~
65
℃
5. Trouble Shooting
5.1 Only black and white or monochrome picture:
① please check saturation, brightness & contrast adjustment.
② Please check "Check Field" is in black and white or monochrome image or other condition.
5.2 NO Image after put on the power
① Check if signal cable connecting are in good condition, and if monitor is synchronized with the input signal, then press the "MODE" and give it a try.
②Check signal cable connecting, and make sure to use the standard adapter to connect the monitor. If power is supplied by battery, please check if the battery is fully charged.
5.3 No sound
① Check if Volume control do not open, press the volume button, and try to increase the volume.
② Check the AUDIO input and ensure there is AUDIO signal.
③ Check whether “Mute" is closed in OSD.
■
If there are still other problems, please contact with our related technologists.
★
As we are improving product features and product performance, so if there is any change on the specification without prior notice.
